Wednesday, September 7, 2011

Asian Bakery Style Milk Buns

Since making bread from scratch is such a lengthy process, I usually wait until the weekend before I undertake such a project.  Well, this weekend I made bread not once but twice which is a lot of arm work since I knead by hand.  And because we hardly ever make bread, the yeast in the fridge actually expired several months ago so I wasn't even sure if my bread would rise.

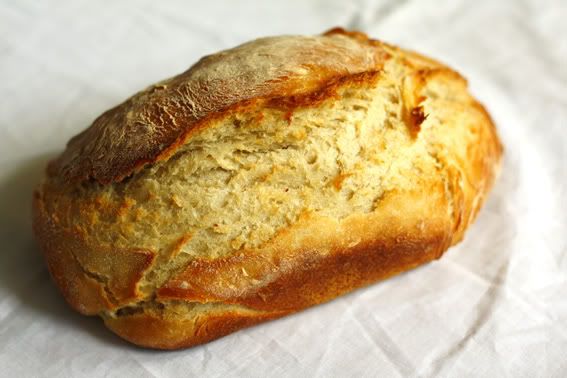
This method of bread making involves making a tangzhong which is a starter made from flour and water.  Adding this to the bread mix results in a loaf that is soft and fluffy like the ones found in Asian bakeries.

Photobucket

  The first batch I made I was a little over ambitious and I decided to make chocolate buns.  I really shouldn't tinker with recipes that I am trying out for the first time....Murphy's Law always holds true.  As well as adding cocoa powder, I didn't knead the butter into the dough properly and so my ball of dough wasn't really a ball and it was nice and glossy rather than being round, smooth and matte.  Also the oven was too hot hence the cracks.  

I had another crack at it the next day since I had some of the starter left.  This time I closely followed the recipe.  The result?  Buns so perfectly coloured, they look like they were airbrushed.  Next time I will be back to tinkering with the recipe.  ;)

Photobucket

Milk Buns
Adapted from Ivonne Chen, via like a strawberry milk

Makes 6 buns

For the tangzhong
50g  flour
250g water


For the dough
350g  flour
55g caster sugar
1tsp salt
one egg
125g milk
120g tangzhong
one tsp instant yeast
30g butter
, at room temperature 

For the wash
Milk or one egg, beaten

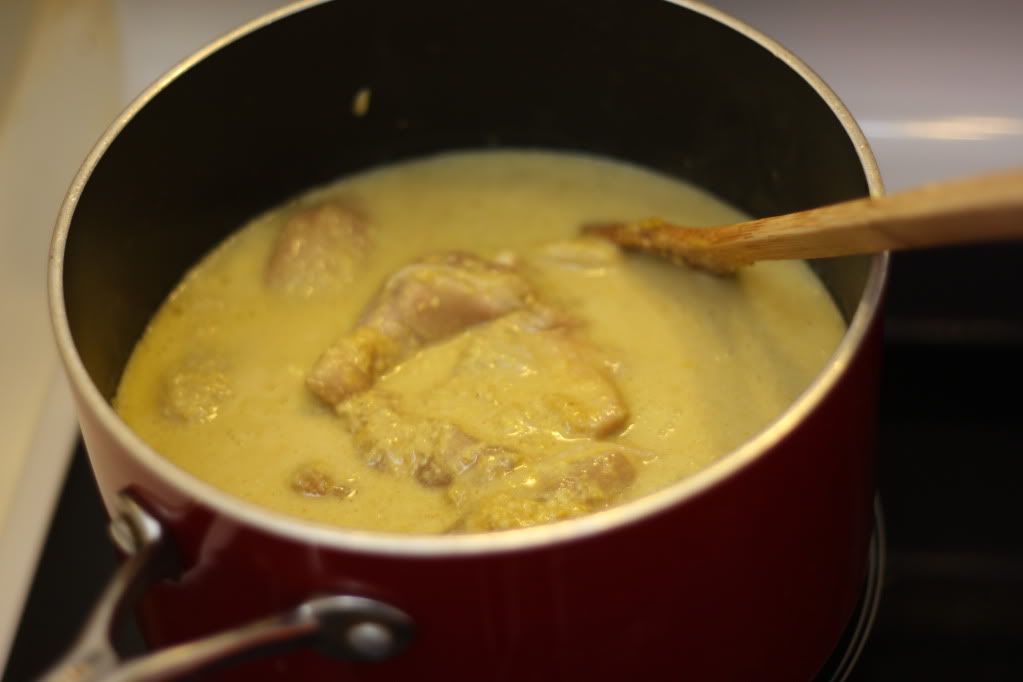
To make the tangzhong
  1. Whisk together the flour and  water until there are no lumps.  
  2. Cook this over a low to medium heat, whisking constantly until it reaches 65°C.  Place in a clean bowl and let it cool.

To make the dough
  1. Combine the flour, salt, yeast, sugar in a bowl.  In another bowl combine the tangzhong, milk and egg.  
  2. Add the dry ingredients to the wet ingredients.  Mix the liquid in until you get a sticky dough.  
  3. Turn the dough out onto a lightly floured surface and knead until it is smooth and elastic, about 10 minutes.  You will know when it is ready when you can stretch a piece of dough until it is very thin without it splitting.  
  4. Work the butter into the dough and knead until it is smooth.  
  5. Transfer to a lightly floured bowl and let it rise for 40 - 60 minutes or until doubled in size.
  6.  Scrape the dough out onto a lightly floured surface and punch to deflate.  Divide the dough into 6 piece and knead each piece into a ball.  
  7. Place onto a baking sheet lined with baking paper and let the dough rise for another 40 minutes.  While the dough is rising, preheat the oven to 180°C or 170°C for fan-forced ovens.  
  8. Brush the dough with the eggwash or milk.  
  9. Bake for 20 - 30 minutes until the bread is golden brown.  Transfer to a wire rack.

Tuesday, July 5, 2011

The Accidental Baker

I discovered this method of baking bread where you let the dough rise overnight in the fridge. It allows for the flavours to develop because the yeast grows at a slower pace...or something.

At 9pm last night I decided to try this recipe out. It was a bit wordy and I really wanted to sleep soon so I only glanced over the method, and subsequently mis-remembered a number of things. The original steps from A Bread a Day proceeds each of my "words of wisdom" in italics.

1.  In the bowl of a stand mixer, whisk together all but a handful of the flour and all the yeast.  Add the water and mix with the dough hook at low speed until a rough dough forms, about 1 minute....  
Mistake 1
I used all the plain flour I had for the dough mixture, no "handful"of flour set aside here.

Mistake 2
I decided to mix flour, water and SALT together, rather than yeast, then let it stand. Um, Mabel, what happened to letting the yeast multiply in this nice warm environment?

2.  Remove the plastic wrap, and add the salt....
Mistake 3
When I read this step, I realised my mistake. So what did I do? I sprinkled the yeast as evenly as I could on top of the dough and proceeded to incorporate it in. *Smack head in frustration*

3.  Turn the dough out onto a lightly floured surface, and knead a few times, forming the dough into a round ball with a skin stretching over the outside. Transfer to a lightly oiled bowl, smooth side up.  Cover with plastic wrap and refrigerate overnight, or for about 8 hours.
Mistake 4
Oh no! I forgot to reserve some flour for the kneading, and since I had run out of plain flour, I proceeded to use cornflour (gluten-free), another boo-boo. Nonetheless I started kneading and it began looking like a nice firm ball, but then 10 seconds later, it became a sticky flaccid mess. I searched for this "skin" that the recipe called for but to no avail. No matter how much cornflour I added to the dough, it reverted to its original stickiness. So I rolled the sticky gloopy dough into a clean bowl, covered, refrigerated, and hoped for the best.

4.  Let the dough stand at room temperature for 45 minutes to 1 hour before proceeding.  Line a large baking sheet with parchment paper.  Gently deflate the dough, and turn out onto a lightly floured surface.  Flatten the dough into a slight rectangle or oval shape.  Fold the two corners furthest away from you into the center of the dough, as though you were beginning to fold a paper airplane.  Starting with that point, roll the dough up into a cylinder, pressing gently to seal as you roll.  Press the final seam to seal.  Transfer the dough to the prepared baking sheet, seam-side down.  Tuck the ends under if desired, to make a more attractive loaf.  Cover loosely with lightly-oiled plastic wrap, and let rise until doubled in size, about 1 hour.  Thirty minutes before baking, preheat the oven to 425º F, and place another baking sheet or oven-safe pan in the bottom of the oven.  If you have a baking stone, heat it with the oven.  If not, your baking sheet is fine.
Mistake 5
I was hoping in the morning that the dough would magically come together overnight to form a ball, but no, it had just oozed to the sides. Something was growing though as there were air bubbles on the surface. When I peeled the sticky flaccid mess out of the bowl and onto the countertop for "deflating", the underside was pockmarked with lots of holes. The yeast was alive!

I tried to shape it the way described but I'm a visual person, and I got lost after shaping it into "paper airplanes" and "rolling into cylinders". So I squished all the air out, formed it into an asymmetrical log with an unintentional lip and dumped it into the loaf tin. Covered it with a towel and proceeded to make a bento box for this competition at Bento & Co instead. At this stage, I really couldn't care less. I had given up on my first attempt at bread.

5.  When fully risen, and using a sharp serrated knife or clean razor blade, make three decisive slashes in the top of the loaf at a 45º angle, evenly spaced.  Transfer the bread to the oven (or baking stone, if using).  Immediately throw 4 or 5 ice cubes into the hot pan on the oven floor.  Bake for 10 minutes, adding additional ice cubes as they melt.
Mistake 6 
Since I felt it was futile to do anything more with this lump, I didn't bother with the slashing or the throwing of ice cubes into the oven. I did cook tofu cubes while the bread was baking, perhaps that provided enough moisture in the air. I think the only thing I did follow in this recipe was the temperature.  I'm very good like that. Did I mention that I had to convert the ingredients down as I didn't have enough flour to begin with?

Baking is an exact science from what I have read but seriously before all of this rigorous scientific understanding of how gluten interacts with proteins interacts with enzymes etc etc, how did our ancestors do it?

The Verdict


OMG times infinity! The loaf more than exceeded my expectations. The crust was crunchy and chewy at the same time. Tick.

The inside was soft and fluffy like supermarket bread. Tick.

I left it on the cooling rack and forgot to try it while hot, but even then it tasted fantastic. Two ticks.

I wonder how this bread would turn out if I actually followed the instructions? To be honest I don't think I could duplicate what I did. Perhaps it was the cold ambient temperature of the kitchen which helped. Perhaps it was my lack of kneading. Who knows! Have you tried this overnight fermentation method before and were you successful?

Monday, June 6, 2011

Apple Dumplings

I remember fondly eating apple turnovers while waiting for the train that took me to uni and after coming home from work. They tasted especially good since I couldn't wait the 10 minute walk to home and dinner. In my hurry to chow them down the icing sugar would inevitably get onto my clothes and I spent the rest of the walk trying to hide the evidence of the white powder. Where did this plentiful supply of gloppy apple and whipped cream with flaky pastry come from? The local Vietnamese bakery with their crazy cheap prices. Besides their turnovers, I loved their sausage rolls and pork rolls. But I didn't love the extra weight gained from eating there so had to stop visiting.


It's been many years since I sunk my teeth into an apple turnover so when I saw this recipe for apple dumplings I thought this was worth a try. I've tried this recipe twice now. The first time I cooked the apples in sugar and butter and forgot about it, until the juice had turned a bit like jam. The second time I doused it in cinnamon sugar. Both variations turned out fine. You can be as creative and fancy as you like with the apples. And why stop at apples, I think any in season fruit would work a treat: cherries, peaches, nectarines could all work.


This is a great recipe to involve the toddler in. We enjoyed turning the butter and flour mixture into crumbs. With the leftover scone-like dough, we turned them into Hello Kitty and cat and dog shaped biscuits. Success, with a capital S.


This recipe was quite easy to make if somewhat time consuming but trust me worth the effort. And surprisingly it tastes just as good if not better cold the next day.


What dessert could you eat over and over again?


Apple Dumplings (Adapted from Australian Women's Weekly)
Ingredients
For the dumplings
4 apples - medium sized apples. Big apples are harder to wrap up.
250g self-raising flour
90g butter plus 1 tablespoon
2 tablespoons sugar plus more for the apples
1/2 cup milk

For the syrup
100g sugar
60g butter
2 tablespoons lemon juice
1 cup water

Method
For the dumplings
1. Peel, core and quarter the apples. Heat up a frypan with butter, add the apples, sprinkle sugar on top, toss till the apples are coated in sugar, then cook till they are soft. You may need to add a little bit of water to help with the cooking process. Pop a lid on if you want to speed things along. No exact science here, I left the apples simmering on the stovetop until most of the liquid had evaporated and the apples were soft. You can make the dough while the apple cooks.
2. For the dough, sift flour into a bowl. Then rub in butter until the mixture resembles breadcrumbs. Don't give up, it eventually gets there. I must've stood there for at least 5 minutes thinking it ain't working, it ain't working when all of a sudden it started looking less like chunks of butter and flour and more like crumbs. Make sure your butter is soft and cut up into cubes to help with the process.
3. Once breadcrumb stage is reached, do a happy dance, then mix in the sugar. Add milk, mix to a soft dough. Roll out the dough onto a lightly-floured countertop until the dough is about 2-3 mm thick. You need a clear surface to work on. Trust me, makes rolling much more pleasant.
4. Cut the dough into 8cm squares, roughly big enough to wrap a piece of apple. And that is your next step.
5. Place a piece of apple in the middle of each square, fold the edges together like wrapping a little parcel. Then place them next to each other in one layer in a casserole dish. Pour syrup (instructions below) over the dumplings. Bake uncovered in a 180º oven for 30 to 35 minutes, till golden brown.   

For the syrup
5. Melt butter in a saucepan, add remaining ingredients and stir. Bring it to a boil, boil for three minutes or until it thickens a little. I found my syrup was still quite runny but once out of the oven it was all absorbed by the dumplings.

Serve with some whipped cream. Makes 12.

Saturday, April 16, 2011

Compare and Contrast

aww australian women's weekly recipe card apricot chicken
aww australian women's weekly vintage recipe card apricot chicken
Apricots, chicken, sour cream -  a dubious combination but apparently a popular one.  Apricot chicken is still a popular dish today, you can even buy the sauce ready made, like from this well-known brand.  That jingle is permanently burnt into my brain.  Thank you commercial TV.

aww australian women's weekly recipe card apricot chicken
This dish is very straight forward to make, half the stuff comes in a can or a tub, not tinned sausages or anything like that.  I mean stuff like apricot nectar and sour cream.  Roadtesting the AWW recipes has been a pleasant surprise, time and time again.  Albeit we have been quite conservative with our choices but c'mon do you want to eat tripe in a cream sauce? *shudder*  What I am trying to say is is that the recipe haven't really been that a(w)wful. 
aww australian women's weekly recipe cards apricot chicken
Posh Nosh never fails to amuse me immensely.  If you haven't seen it yet, I strongly recommend you check it out.


Apricot Chicken (adapted from Australian Women's Weekly)
500g chicken thigh pieces
1 medium onion, finely sliced
30g butter
1/2 tablespoon cornflour
half a can of apricot nectar (405mL size)
salt, pepper
60g dried apricots, chopped in half
1 green capsicum, thinly sliced
1/4 cup sour cream

1. Melt the butter in a saucepan and brown the chicken pieces.  Remove the chicken and add the onion to the saucepan.  Saute until it becomes transparent.
aww australian women's weekly recipe cards apricot chicken process
2. Whisk the cornflour into the apricot nectar.  Add to the pan and stir until the mixture boils.
    3. Reduce the heat and add the dried apricots, chicken pieces and simmer until the chicken is nearly cooked, stirring occasionally.aww australian women's weekly recipe card process
    4. Add the capsicum and simmer for another 5-6 minutes or until the capsicum is soft.  Stir in the sour cream, stir until the mixture is hot. 
      aww australian women's weekly vintage recipe cards apricot chicken

      Thursday, March 24, 2011

      Gawd, a hippie recipe!


      Today we are looking at wheatgerm. I always thought it was one of those additions that cost you an extra $1 at a certain well known juice joint. Adding wheatgerm/echinacea/wheatgrass gives you that happy-feel-good-about-yourself buzz that you're doing something healthy but we all know that guzzling down a 98% fat-free yoghurt smoothie doesn't necessarily mean it is free of sugar.

      So for today's roadtest I am not heralding its nutritional value, but if you happen to have a whole bag of wheatgerm lying around from a health-food fad (like me), this is another way of using up all that wheatgerm you bought.

      It actually tastes quite nice with a smidge of cream cheese on top. Wheatgerm crackers are indeed a lovely snack by itself.

      What ingredients are sitting in your cupboard waiting to be used? Truffle salt? Bonito flakes? In my case it's oat bran.


      Wheatgerm Crackers (adapted from Australian Women's Weekly)
      Ingredients
      1/2 cup wholemeal plain flour (or plain flour with some oat bran: another bag to be used up somehow)
      2 teaspoons baking powder
      1/2 teaspoon vegetable salt (plain salt can make do)
      1 teaspoon white sugar
      3/4 cup wheatgerm
      60g butter
      2 tablespoons water


      Method
      1. Sift flour, baking powder and salt into a mixing bowl. The husks leftover in the sieve are returned to the mix.
      2. Add sugar and all the wheatgerm to the bowl. Mix lightly.
      3. Rub in the butter until mixture resembles fine breadcrumbs. Then stir in water.
      4. Gather dough into ball and place on floured surface, knead lightly for a couple of minutes. If the dough is too sticky add more flour.
      5. Roll it into a long cylinder to about 5cm in diameter. Wrap in cling film and pop in the fridge to harden up - easier to slice into circles, you see. I learned the hard way. With my first batch, I rolled the dough out flat and made circles, only to discover that the dough had stuck to the counter top. I ended up with many misshapen crackers. Second batch I discovered the powers of the fridge.
      6. After an hour or so has passed, take the dough out of the fridge to see if it is ready to slice. Slice away into rounds, place on lightly greased baking trays.
      7. Bake at 180°C for about 10 to 15 minutes or until light golden brown.
      8. Cool on baking tray. Makes approximately 30. Or in my case 20 since I ate 10 while they were cooling.

      Wednesday, March 2, 2011

      Cream Buns

      After Lorraine from Not Quite Nigella mentioned tuckshop food, I remembered our AWW cards had a recipe for cream buns.  I am not talking about fancy brioche bread with freshly whipped cream, I'm talking about the cream buns with plenty of mock cream and that red sticky stuff that passed as jam.  Those buns that were so tightly wrapped in clingfilm that half the cream comes away with the plastic wrap as you unwrap your bun.  

      I am not sure if this recipe for mock cream gives you the mock cream found in cream buns, to me it looks like a buttercream.  Let me know if you try this recipe!
      australian women's weekly recipe card cream bun

      Thursday, February 17, 2011

      Creamy Potato Bake

      onions and potatoes for potato bake
      What is there not to love when a dish consists of carbs aka potatoes, half a tub of cream cheese and two rashers of bacon? Rather than calling this potato bake,  I would describe this as more of a baked potato that has been pureed with some milk and an egg, or a fancy mashed potato.  Whatever you want to call it, you have to try it, whether you are in need of some comfort food or you like carbs (like me!).

      The onion, bacon and cream cheese mix tastes good on its own, like a chunky dip.  I was ready to hunt down some crackers but then I remember the potatoes.  Sigh, sometimes life is tough.  ;)
      Photobucket
      aww australian women's weekly recipe card creamy potato bake
      Creamy Potato Bake (adapted from Australian Women's Weekly)
      Ingredients
      500g potatoes
      30g butter
      1/4 cup milk
      125g cream cheese
      1 onion
      1 egg
      salt, pepper to taste
      chopped chives for garnish (optional)
      2 rashers of bacon
      1 clove of garlic

      Method
      1. Peel and chop the potatoes.  Boil the potatoes until tender and drain.  Mash the potatoes with the milk and half the butter.
      2. Finely chop the onion and bacon, and mince the garlic.  Start to saute the bacon until some of the fat renders out, add the onion and cook 2-3 minutes, stirring regularly.  Add the garlic and cook until most of the onion is tender.  
      3. Beat the cheese until soft, then beat in the egg.  Beat in the onion, bacon, salt and pepper. Stir this mixture into the mashed potatoes.
      4. Spoon the mixture into an ovenproof dish.  Dab the remaining butter onto the top.  Bake in a 200°C oven for 25 minutes or until the top starts to brown.  Garnish with some chopped chives.
      5. Eat with gusto.
      Photobucket

      Monday, February 14, 2011

      Chicken Divan

      Divan?  What is that?  My first two thoughts when I was scanning this.

      So what is a divan?  According to the New Oxford American Dictionary, a divan has two definitions.


      Hmm, neither of these sound right.  On further Googling (yes that is a valid verb), Wikipedia tells me that it is a classic American dish and was originally created at the Divan Parisienne Restaurant in the New York Chatham Hotel.  Chicken Divan recipes share common ingredients like broccoli, cheese and chicken.  Some use tinned soups, others do not.  Others also add mayonnaise.  The one below is a basic recipe, good for those times when you are prosciuttoless, quinoaless or Porcini mushroomless, which in my case is all the time. 
      aww australian women's weekly recipe card chicken divan

      Friday, February 11, 2011

      Caviar Log

      If you live in Australia, be sure to check out Posh Nosh on ABC2 iview.  Food preparation in Posh Nosh involves shaming and annoying fish, and embarrassing and disappointing root vegetables.  Nearly every single sentence uttered from Minty and Simon Marchmont are very quotable, bizarre and hilarious.  

      On caviar, Simon Marchmont has this to say, "Don't touch the stuff.  It's naff, it's so 1980s.  It's loads of money, red braces, naff."  When caviar is to be served as a caviar log, I have to agree.

      aww australian women's weekly recipe card caviar log

      Friday, February 4, 2011

      Indonesian Chicken

      Thought for the day
      Be kind to your neighbours.


      Why?
      We live in a block of units so come dinner time all sorts of smells are wafting around. Sometimes it smells like caramelised onions, sometimes roast chicken, and sometimes a fragrant blend of spices. It used to drive me nuts wondering where that smell emanated from. Not our unit that's for sure. We're a bunch of spice newbs.

      Well one day I came home to a bowl of scary red curry chicken from our upstairs neighbour. This was in payment for IT support given by my husband. The curry was a heady blend of ginger, lemongrass, curry leaves and I know not what else, since this neighbour doesn't have a recipe. Cooking from the heart he says. Isn't that the most hackneyed overused expression? If you hear me saying that you can take away my between-meals kitchen access privileges.

      Spices used in Indonesian Chicken

      With one tall glass of milk on hand, the curry was not ridiculously spicy. The chicken was tender even after reheating and the flavour permeated through to the bone. I'm glad this neighbour is now our food swapping friend.

      With dreams of eating curry again, when I saw this recipe in the Australian Women's Weekly (AWW) recipe box for Indonesian chicken, I knew I had to give it a go. The result was surprisingly good. Real spices were used in the recipe which seems to be ahead of its times (circa 1979). This dish is easy to prepare. The meat is marinated the night before. Then simmered in coconut cream before being browned for colour and extra 'brown' taste, you know what I mean. It doesn't match our neighbour's curry but is a close second.

      Chicken marinating in the curry mixture

      Chicken cooking in the coconut cream

      Served with steaming hot rice and salad.

      Next time you see your neighbour, say 'Hi". You may also experience an awesome curry!
      What nice thing have you done for your neighbour?

      Indonesian Chicken (adapted from Australian Women's Weekly)
      Ingredients
      1 whole chicken, or 1 kilo of chicken drumsticks
      1 cup coconut cream
      1 cup water
      1/2 teaspoon turmeric
      1 teaspoon salt
      1 teaspoon ground ginger - you could use fresh ginger
      1/2 teaspoon black pepper
      1/2 teaspoon cayenne pepper - adjust according to your spice tolerance. I didn't add any.
      2 tablespoons peanut butter - trust me, it works
      1 tablespoon water
      1 onion, blitzed in the food processor/stick blender (you might need to add in a little bit of water to help move the onion in the receptacle), or finely chopped
      2 cloves garlic, finely chopped
      1/2 teaspoon grated lemon rind
      oil for frying

      Method
      Spice paste
      1. Saute the onion and garlic in oil until it smells fragrant.
      2. Add in the spices: turmeric, salt, ground ginger, black pepper and cayenne pepper (if using).
      3. While that is cooking, make a paste of the peanut butter and one tablespoon of water. Add that into the spice mixture. Stir until your kitchen starts smelling like a street market stall i.e. one or two minutes.
      4. Cool this down and then rub it into the cut up chicken. I cut my whole chicken up into big one-eight pieces. I let it marinate overnight to allow for maximum flavour penetration.

      Cooking the chicken
      1. Gently warm up the coconut cream and water, plus lemon rind. Do it on a gentle heat and keep stirring, otherwise the cream will curdle like mine did. Still tastes fine, but looks a bit iffy.
      2. Throw in the marinated chicken pieces and cook until 90% done; approximately 20 minutes on a gentle simmer. This will depend on the size of your chicken pieces. You'll know it's cooked when you prick the chicken with a fork and the juices run clear. Check a drumstick/thigh piece as this takes longer to cook.
      3. Then take out the chicken from the curry mixture, heat up a frypan and brown the chicken pieces on each side. Don't walk away! It only takes a couple of minutes for a brown crisp to form. Drain on paper if you are concerned about the fat content. Add them back into the curry when serving.

      Notes
      I kept the chicken skin so once everything was cooked there was a distinct half centimetre layer of oil. I think maybe the cream and oil split too. If you find yourself in this position, take the chicken out of the curry sauce, then reduce the sauce in a frypan with a wide surface area (helps speed up the process). I reduced it for about 15 minutes. Then I waited for the cream to settle to the bottom, then scraped the oil from the surface of the sauce with a spoon. I'm guessing this process would be completely unnecessary if you used skinless chicken and didn't boil the heck out of the cream.

      Saturday, January 29, 2011

      Mozzarella Strips

      Finally!  Something that isn't gelatinised, cold and meaty, or tripe.  In my opinion, anything deep fried tastes good.  For example, churros, fries, Mars bars, prawns, springs rolls, zucchini, the list goes on.  This would make good party food since there is nothing particularly offensive about cheese, unlike Brandy Pate. 

      I don't know which one I would want to eat more, mozzarella strips or crispy frankfurts, I do love processed meat.   
      australian women's weekly aww recipe card mozzarella strips

      Thursday, January 27, 2011

      Apricot Health Candy


      As a mother to two little girls I'm obsessed with their poos, ahem, BMs (bowel motions). To all the mums out there, "Aren't You???" Maybe it was my upbringing. I remember every morning I had to report back to HQ (mum). Was it a 10/10, a 5/10 or an 11/10? Fiber was a big deal in our home, and so will be for my two little girls. You pity them? So do I.

      For the sake of adding more fiber into our collective diets, I'd like to share this recipe I found in the AWW recipe box. As an added bonus it tastes good too. Hurrah for young and old.


      This would also be a nice substitute for supermarket confectionery. The health candy is sweetened by honey which we all know is better than white sugar. I also like the inherent flexibility of this recipe since you could substitute with whatever dried fruit you have on hand.


      You could also include nuts and seeds for an added boost of fiber, omega-3 and protein. This certainly will be my go-to toddler and adult snack recipe.


      What healthy snacks do you feed your children?

      Ingredients
      125g dried apricots
      1/2 cup water
      1/3 cup blanched chopped almonds
      1 teaspoon lemon rind
      1 teaspoon lemon juice
      1 teaspoon orange juice
      1/2 cup honey
      1 cup skim milk powder
      1 tablespoon wheatgerm
      1/2 cup chopped dates
      1/2 cup coconut, plus extra for rolling in

      Method
      1. Chop apricots and then combine with water and honey in saucepan. Simmer for 10 minutes, or until tender. Keep the liquid.
      2. Add the remaining ingredients to the saucepan and mix well. They are now ready for shaping. The recipe card asked to roll into a log. But we turned them into little balls instead.
      3. Roll the balls in the extra coconut as a coating. Ready to eat straight away, or you could store them in the fridge for later.

      Tripe in Parsley Sauce

      Tripe may have been a cheap way to get your protein 30-40 years ago, though I don't think that is the case nowadays.  Who eats tripe now?  Do you?  If you do then my hat goes off to you, sir/madam! Although I could be wrong since Wikipedia gives an extensive list of dishes that feature tripe, it seems to be a dish that is widely eaten in many countries.  

      Personally, I do not like the texture of tripe - soft, spongy, it sets my gag reflex off.  However  it does absorb flavour well, I'll give it that.  Here tripe has been paired with a creamy sauce and plenty of parsley.  Let me know if you do happen to eat this (and like it!) or you had a crack at making it.  You will forever be my hero.

      aww australian women's weekly recipe card tripe in parsley sauce

      Saturday, January 22, 2011

      Apricot Sour Cream Pie

      Today we trialled an easy straightforward dessert, Apricot Sour Cream Pie. The hardest part about this dish was taking the photos! You see, we live in an apartment which is in the shade for most of the day. In fact, it's so dark that while in the car I have to squint. It is a shock to see that it can be bright outside! So you see working in a darkened room would be a challenge. And mental note to self: "Go outside more".


      The photo taking process was laborious. We spent several hours, getting increasingly hot and frustrated, playing around with reflectors (i.e. foil), artificial lighting (i.e. one lonely reading lamp with baking paper wrapped around it), and backgrounds (i.e. white pieces of material). Each shot, we improved on the image but golly gosh it was hard work. Why? Because we are newbs. It really boils down to that.

      We took a photo of how all the props were placed.  Position of lamp in relation to picture on wall. Check. State of scrunched up baking paper. Check. Where Mabel stands with said lighting in relation to corner of bed and chair. Check. Wait up...isn't this all going to change depending on the time of day, and amount of light filtering in? Oh Nooooooooooo. I foresee many more hours spent tilting, straightening, checking and shining. I found it fun nevertheless. But that goes without saying, since Mary did do most of the hard work, hehehe. The joys of being the big sister!
       
      We couldn't wait to eat the pie!

      Photobucket
      Apricot Sour Cream Pie (Adapted from Australian Women's Weekly)
      Ingredients
      For the base
      185g plain sweet biscuits e.g. milk arrowroot
      150g butter, melted


      For the filling
      Biggest tin of tinned apricots you can find (ours was 820g), drained of syrup, and chopped roughly
      4 tablespoons sugar (3 tablespoons for the apricot and 1 tablespoon for the sour cream)
      1 tablespoon plain flour, mixed with 1/4 cup water
      1 tub of sour cream (we used a 250g tub)
      1 egg
      1 teaspoon grated lemon rind (optional)
      nutmeg


      Method
      Base
      1. For the base, crush biscuits finely. I placed the biscuits inside a freezer bag, and smashed it with the end of a rolling pin. Beware of holes in bag.
      2. Combine crushed biscuits with the melted butter. You know you have enough butter when the mixture does not crumble when you squeeze it together in your hands. Don't worry about the fat content. Take the pie to work, distribute to your neighbours. That's what I do.
      3. Press biscuit mixture into a springform pan. Try to press some of the mixture up the sides of the pan.
      4. Put into fridge, while preparing the filling, which now follows.


      Filling
      5. Combine the drained chopped apricots and 3 tablespoons of sugar in a saucepan. Stir until sugar is dissolved.
      6. Now it's time to thicken the apricots with the flour and water mixture. Blend flour and water first in a separate bowl. Pour into saucepan slowly and stir vigorously to avoid lumps. Take off the heat and cool.
      7.  Meanwhile combine the sour cream, egg, lemon rind and 1 tablespoon sugar in a separate bowl.
      8. Now onto assembly. Spread apricot mixture over biscuit crumb crust. Bake in a 180°C oven for 10 minutes.
      9. Then, take it out of the oven, spread the sour cream mixture on top of the apricots, sprinkle some nutmeg on top and bake for another 20 minutes, or until the cream has set. Ours was wobbly in the centre when you shook it but had actually thickened enough to cut. That's it. Enjoy.

      Thursday, January 20, 2011

      Broccoli with lemon sauce

      I'm not sure about teaming lemon sauce with broccoli. I googled this dubious combination and I do get hits for it though. I see this is another dish that I was missing out on while growing up.

      Tuesday, January 18, 2011

      Awwful Dinner #1 - Part 3

      Finally, if you survived the sauce, then be prepared for some more orange goodness.

      This dessert was very easy to make and is great for hot weather.  We served ours with evaporated milk, the creaminess of the milk cut through the sweetness of the jelly which is good if you are not partial to sweet things.  And if you don't like the richness of panna cotta, this is a good alternative.

      As my sister pointed out, it has the texture of mango pudding that you get in yum cha.  Make it with mango flavoured jelly (or mango nectar), spoon some evaporated milk over it and blam!, you can pretend you are in a busy Chinese restaurant where the conversation is loud and the trolley ladies glare.

      aww recipe card passionfruit fluff

      Passionfruit Fluff (adapted from Australian Women's Weekly)
      Serves 2
      Ingredients
      1 packet lemon jelly crystals
      1 cup boiling water
      2 passionfruit or half a 170g tin of passionfruit pulp
      2 tablespoons chilled evaporated milk
      passionfruit fluff jelly ingredients
      1. In a bowl, dissolve the jelly crystals with boiling water and stir in the passionfruit pulp.  
      2. Chill the liquid until it is partially set.  
      3. Add the evaporated milk and beat until it is light and thick.  
      4. Pour into a serving dish or glasses and chill until set.

      passionfruit fluff mixing

      passionfruit fluff jelly
      Related Posts Plugin for WordPress, Blogger...